IMPORTANT: If you’re just looking for a simple Origami Yoda to fold, GO HERE.

The truth is that this Yoda is not folded the same way as the one on the cover of “The Strange Case of Origami Yoda.” However, it looks similar… sometimes.
The great thing about this particular origami Yoda design is that there’s plenty of room to “sculpt” Yoda the way you want to. Of course, the bad thing is that sometimes your sculpture may come out looking a little funny. (Like the one in these instructions, perhaps!
I call this Origami Yoda the Deluxe model. It will be helpful if you have already folded my SIMPLE YODA model and maybe even my WORLD’S EASIEST MODEL.
If you just want to fold a nice Yoda finger puppet without a lot of bother, then I recommend one of the other two. This one is really for the person who’s willing to wrestle with the paper a while.
If that’s you then here it goes…
Begin with a 7 inch X 5 inch piece of paper. If it’s two-colors, then start with the robe color up.
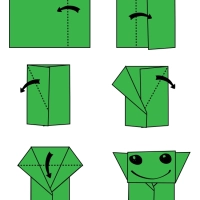
First, fold down at a point 4.25 inches from the bottom. Like this:

Now we’re going to create a series of pleats. A pleat is just a little paper zig-zag made by making two folds close together. It’s the same way we made Yoda’s arms in the simple model.
The placement of these pleats is going to give Yoda his personality. The first one makes his mouth. On the left you can see the two folding lines. On the right … I’m afraid you can’t see much at all, but there is a zig-zag there now running all the way across.

This picture may give you a clearer idea of how a pleat works. In this case fold up and crease, then fold back down on a new line just above the crease. The result is a zig-zag in the paper.

Next we’ll make two seperate pleats very close together to make his eyes. The bottom pleat is just like the one you made a minute ago. The top pleat is an upside-down version of it.

It’s hard to see in those pictures, so here is a side view showing the pleats:

The next pleat should be easy, because it’s the same as from the Simple Yoda, except that we want to keep it much lower down on the body:

Looks like a huge mess doesn’t it? It’s going to get worse.
Now we’re going to make the ears … again, the same way we did in the simple model. First bo folding down both top corners:

And then tucking them inside. The pleats make this a little tricky. Don’t worry; it doesn’t have to be perfect:

Now flip it over and fold both sides in at an angle:


Now fold the ears out:

And now the big moment, fold the head down. Yoda’s mouth is at the very top. Fold it down so that it comes just above the arms…

Now here’s you chance to do some paper sculpting. Use the pleats to create eyes and a mouth. You can also [GENTLY] pull out the top layer of paper from the pleat on the ear to make those more sculptural as well:

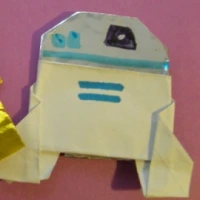
Now fold back part of his robe, while letting his arm stick out. If you crease very carefully, it will create little green triangles. This is a delicate operation, but it MAY leave you with a small green hand that you can bend back:

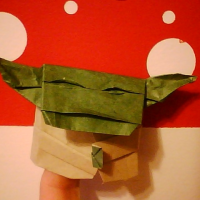
 A little tucking and folding at the edges of the robe, should allow Yoda to stand up like this.
I think the eyes are too high on this particular Yoda. The one I was drawing dotted lines on turned out better … except for his teeny hand. I may try to refold that part:

As I said, there’s a lot of room for “sculpting” and sometimes it works out better than others.
Experiment a few times and when you get a good one … send me a picture for this Website!
Good luck … and may the force be with you!


A student review of your book The Strange Case of Origami Yoda was recently posted at http://www.flamingnet.com.
Learn about Promotional Opportunities available to you now that your book has been reviewed by Flamingnet.
Link to Flamingnet Promotional Opportunities
Please post a comment on our website bulletin board, especially about your book and plans for future titles.
Link to Flamingnet Bulletin Board
Please also post information about your book on our Flamingnet Facebook Page.
Become a “fan,” add your bookcover to our photo album, and write a message about your book on our Wall.
Link to Flamingnet Facebook Page
If your book has received the FLAMINGNET TOP CHOICE AWARD, email us to request a special award graphic to place on your website with a link to our review of your book.
Email us to Request Flamingnet TOP CHOICE Graphic and Link
Thank you for allowing us to review your book.
Flamingnet Book Reviews
Dude, don’t try to spam this site!
No spam!
Guys, the guy is saying they gave a good review of toms book. They even said they were giving him an award. Don’t complain about something like that.
Don’t spam the website. We didn’t come here for ads, we came here to view a website (one that actually EARNED the popularity).
if i were you,spammer, i would just withdraw from this website and go somewhere else.i swear on my life i will never visit your site.
Don’t be a Harvey!
I know, seriously, what kind of website is that (I’m not trying to be a Harvey, Gary is the one doing that)
Woah guys, he isn’t spamming just becuase he worte alot, hes complimenting this book, that WE all like, he’s even telling us it might get an award
Please, if you would want to spam someone, do it somewhere else because this is a ORIGAMI site, to learn AND SEE other’s creations not to spam.
ya so beat it you dumb spammer
if yoda was here he would say “spam do not beat it you must”
That’s what I call not a Harvey
DON’T SPAM AN ORIGAMI WEBSITE!!!!
(cough)spammer(cough)
*sigh* you guys complained about spamming so much you ended up adding even MORE spam…
lol
yeah.
Yoda:Noah McConnell right he is. Complain spam about you do, spam you do too.
XD your right we shouldn’t complain so much or we’ll spam even more than “THAT” guy at the top of the comments
I agree, just let it go.
if you don’t spam, you will get a 5% discount on toast.com!
Just joking. Noah’s right.
dude your spammin thats not cool GET OFFA THIS RIGHT NOW!!!!!!!!!
yum yum spam spam
Your a big fat can of spam
my yoda:spam do not.another site you must go.
Spamming is not cool,man!!!!! Delete it!!
Spamming is not cool,man!!! Delete it!!!!!
Not stooky bro your spamming about spamming which is annoying because we’re here to learn Star Wars origami not arguing about spamming on a site
Spamming isn’t cool,dude!!!!!! Delete the comment (or the spam!)
dude, your spamming by complaining about spamming. ):<
Just no more spamming!!!! Period.
mother hugger stop.
I just bought the first the first
please dont spam(I have darth paper and fortune wookie
The spamming and advertising path if you choose,an agent of evil you will become…. Yoda says
Star killer: Don’t spam this site up bro
Hey! That’s spamming! We don’t allow spammers!
You are all complaining about toms book getting a good review And maybe even a reward…
What Luke Foldon said, I will agree with.